| Greetings.
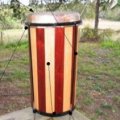
This is a picture tutorial on how I build a
Kete drum. Kete Drums are made and played by
Rastafarians all over the world and they
make up part of the Nyabinghi Music that
developed in part into Reggae. These drums
descend directly from African percussion
instruments.
While I am not a Rasta, I have a huge
amount of respect for the music and the
culture of Rastafarians. My love for the
music and a love for working with my hands
led me to learn to build these drums. In
this tutorial I make no claims to be an
expert on Drum Building. This is just how I
do it, but it is my desire to show respect
to the originators of these great drums, by
doing my best to build a quality instrument
that honors their music and talents. I want
to share what I have learned with you. I
want you to be able to build a drum that you
will cherish. I want you to build a drum to
give to some one else. Share the vibes!
Spread the power of music. Spread Jah Vibes!
Blessings and respect!
As a disclaimer, I want you all to keep
safety in the forefront of your minds. There
are many things in this tutorial that if
done in a haphazard manner sever injury
could result. Be safe. If you are not
experienced in something get help from some
one who knows what to do. That being said…
if I can do this, you can too. This is not
genius work. Some of it takes practice, but
you can build a drum that you will be
overjoyed to show to others and play. Now on
to the tutorial…
Materials and Tools needed: (look on Ebay
for Wood and tools!)
Wood, obviously. It takes about 2 planks
of 6”x ¾ x 8’ to build a Kete drum…
more or less.
Drumhead. Traditionally goatskins are
used, but I have seen Kete drums made with
calfskin. Typically, I purchase the skins on
E-bay; however, there are other sources on
the internet. I prefer African goatskins
with hair on them. They haven’t been
treated with any chemicals and, supposedly,
due to the climate, they have a thinner
hide. I hope that using African hides will
also lend support to the local African
economies, at the same time using a material
that is a by-product of one of the major
food sources. These hides are rawhides, not
treated leather. Some people will prefer not
to use natural hides at all. For traditional
purposes, I have always used natural hides.
I have not tried any of the synthetic
drumheads, but there are some available at www.remo.com.
I use the center of the back because this is
where the thickness is most consistent. They
tend to thin around the edges and are not
consistent. If you are making small drums,
you may be able to get two drumheads from
one hide, but typically, I use one hide per
drum. I will cover more on this in the
section of the tutorial that discusses
handling the goatskin.
You need an accurate table saw, and a
circular saw…for milling the wood into the
correct sizes and shapes.
A four-inch angle grinder, with a
grinding wheel, a cut off wheel and a
sanding disc.
You need a means to sand the wood. I use
a pneumatic sander. This runs on compressed
air. The one that I have is designed for
auto bodywork. It has a random orbit.
Sand paper.
You will need to finish the wood… I use
polyurethane. There are many options here.
I also use a router. This is not an
absolute necessity but it makes things much
faster than the alternative.
You have to glue it together. I use
Titebond II wood glue. There are several
options here but keep clean up in mind. You
DO NOT want to use polyurethane glue such as
Gorilla Glue. You have to use your hands and
these will not come off skin!
You will need a means to weld the metal
parts. I bought a small wire feed welder for
this. I love this thing! For some reason my
wife won’t let me keep it in bedroom
though… I have no idea why… Many of the
drums that I built I had the welding done by
friends, until I bought a welder.
You are going to need ¼” round cold
rolled steel to build metal parts from… I
cover some of the options for this in the
later parts of the tutorial… I also use
two pieces of flat “plate” steel to
build rings from, but you can use the same
round steel mentioned above…
¼” All thread rod or a means to cut
threads…
You will also need a couple of cheap
single blade disposable razors for shaving
the goatskin. I prefer Bic Razors that have
the white handles and the orange blade
cover. I cut off the protective edge to
expose the blade and then at 45-degree
angles, just slightly in the corners of the
blade, I sand them round. Just about a 16th
of an inch is all that is required. I do
this to prevent gouging the hide as I remove
the hair…you’ll see.
Before we go on I am going to give you a
few terms that I have used through out the
tutorial, so we can all understand what I am
talking about…. (These are my terms, and
may not be the technically correct term,
because I have found no reference materials
on Nyabinghi Drums.)

Ok good enough. Let’s get
started!
|